Note from Alexis: I don't typically publish guest posts, but this is an exception. This post is from one of my team members, Heather van der Hoop, who helped me self-publish my first Kindle book. Because Heather was the mastermind behind making sure we set ourselves up to succeed with this venture, I asked her to share some of the tips and tricks we learned along the way. The result is this fabulous blueprint for Kindle publishing. Enjoy!
 While self-publishing through your own site has its benefits, the massive audience of Amazon's Kindle store makes it appealing for authors looking to share their work with new readers. Publishing for Kindle comes with its own challenges, especially in the design and formatting departments.
However, if there's anything we all know Alexis loves, it's experimenting with new systems, methods and technologies. While writing her most recent book, You Deserve to Love Your Job, she knew she wanted to test the Kindle marketplace for herself.
Here's how we took the book from manuscript to finished product, including lessons learned along the way.
Your first hurdle is deciding between Kindle Direct Publishing and KDP Select. Both connect your work with the millions of Kindle owners and readers who use Kindle apps on their smartphones and tablets. Both offer 70 percent royalties for books priced $2.99 to $9.99.
The big difference is that KDP Select requires 100 percent exclusivity — your digital book cannot be sold anywhere else.
While there's a lot of debate about the merits of KDP Select, it was the clear choice for this book for several reasons:
Experiment: Alexis wanted to see whether KDP was a worthwhile complement to her own online store, with the goal of gaining exposure to a new audience of Kindle owners and using the Amazon algorithms to boost sales. Rather than dilute the test by publishing on a variety of platforms, we opted to go with KDP alone, so the exclusivity clause didn't bother us.
Effort: Instead of spreading our efforts across several platforms, we opted to focus our energy on only one to maximize the returns.
Promotion options: KDP Select allows you to either offer the book free for five days or discount it for up to seven days through a Countdown Deal, which appealed to us — especially since during a CD, you still earn 70 percent royalties. You can run promotions manually if you're in KDP, but once you price your book below $2.99, you'll only get 35 percent.
Lending Library: All KDP Select books are included in the Kindle Owners' Lending Library, which is free for Amazon Prime members. Every time your book is borrowed, you earn a share of a monthly fund ($1.2M in April 2014). While the fund wasn't a huge draw, we were curious to see how many times the book would be borrowed. No earth-shattering results here: we only had five borrows in February and March 2014.
Choosing whether to use KDP Select or publish on more than one platform is an individual decision; you'll have to figure out what makes sense for your work. One author who has made KDP Select work well for him is Steve Scott, who has had 39 books in the program. One benefit he mentions is that with so many books, he could choose to constantly run Countdown Deals, which leads to greater exposure for the rest of his catalogue.
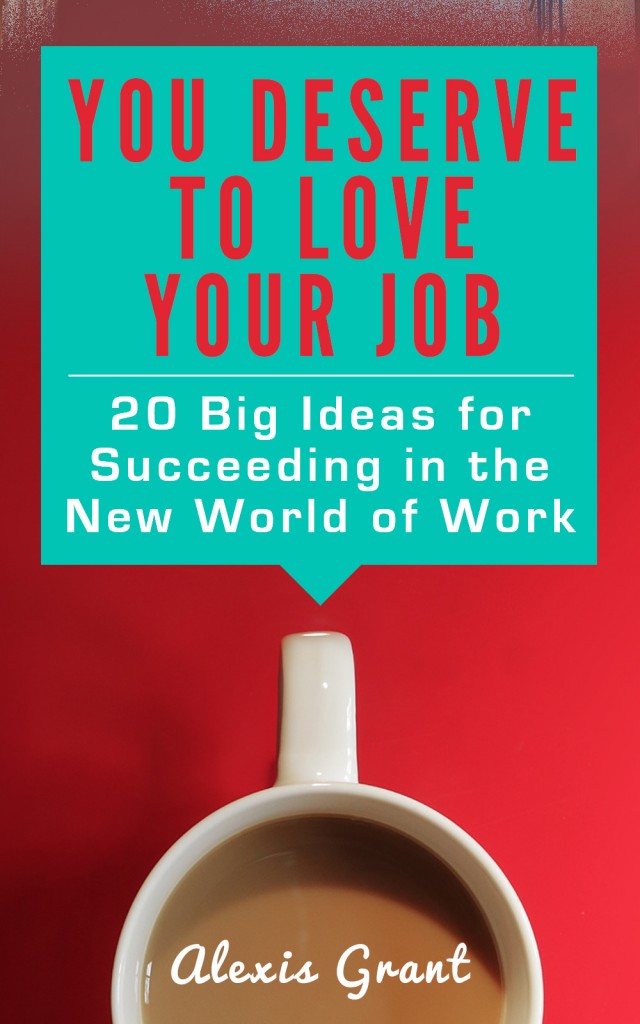
Your cover is a crucial element of your ebook; it's all that Amazon will show potential buyers who scan Top 100 lists and “Customers Who Bought This Item Also Bought.” While we have a designer on the Socialexis team, we've also had good experiences using crowdsourcing sites like 99designs or Crowdspring.
Your cover must look good even when it's tiny: your book's page shows a 160px by 250px version, while the “Customers Who Bought This Item Also Bought” covers measure only 60px by 90px. Bright colors, bold text and a defined image help create an appealing cover. You'll need a 1563px by 2500px image; Amazon recommends a 1.6 height:width ratio.
One way to make sure your cover resonates with potential readers is to have your designer create two or three options, then ask your audience for feedback. This not only lets you see whether there's a clear preference, it also clues you into small details you might not have considered. Alexis' readers chose the final design and shared valuable feedback that helped us make the cover more attractive.
While you can technically upload formats including .doc, RTF, PDF, txt, ePub and HTML, most experts recommend uploading your book as a mobi, a format specific to Kindle. DIY'ing the conversion can be time-consuming — you want to make sure everything's perfect! — but it's worth it to learn the process so you'll save time on future books.
First, download Amazon's free programs KindleGen and Kindle Previewer. KindleGen converts HTML files to mobi, while Kindle Previewer shows you how your book will appear on different versions of the Kindle.
Next, open Scrivener and get ready for it to blow your mind. Once you tell Scrivener where to find KindleGen, its Compile function handles the conversion for you — all you have to do is specify formatting choices.
While there will be lots of trial and error — I went through at least 25 test conversions — it's worth it to play with different settings and see what looks best for your book. Each conversion took fewer than 10 seconds; most of your time will be spent reviewing in the Kindle Previewer and tweaking Scrivener's Compile settings.
A few tips: don't include a cover in your Compile, since you'll upload it to Amazon separately. Scrivener can automatically create a Table of Contents that links to each chapter during the Compile; just check the box under HTML Settings. Choose whether you want it centered, which is the default, or left-aligned; if the latter, go to Layout and uncheck the box next to “center the TOC.”
If your chapters have complicated names and structure like Alexis' book, make a TOC manually using Scrivener links, which you'll find under Edit –> Scrivener Link –> New Link; then check the “Convert Scrivener Links to HTML links” box under HTML Settings to turn these into regular hyperlinks when you hit Compile.
For a detailed walk through the process, read Patrick Hester's Scrivener Quick Tips Series, especially the posts on Building an Ebook. Ed Ditto also explains how quick and easy the process can be in his guest post on The Book Designer, and the Google+ Scrivener Users Community is extraordinarily helpful. If you don't have Scrivener, its creators offer a 30-day free trial (that's 30 days of use, not 30 days from download) and it's available for both Windows and Mac users.
Before you get to the technical aspects of uploading and publishing your book, consider the strategic side of the process. Upload your book at least 48 hours before you plan to launch — though Alexis' book was ready within eight hours, you'll want that buffer time if anything goes wrong.
In How to Start Publishing for Kindle, Jeff Goins recommends publishing your book on Amazon a few weeks before your ideal launch date, then sending free copies to friends, family, colleagues and bloggers in your field and asking them to leave a review on the book's Amazon page. That way, when you tell the world about your book, prospective buyers will see lots of positive reviews — a big factor for those who may not be familiar with your work. While Jeff recommends sending out 150 to 200 free review copies, we only sent about 20, which resulted in 11 reviews by launch day. We probably could've spent more time on this, but those reviews seemed to do the trick.
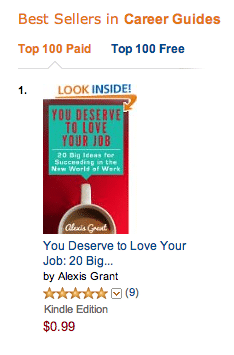
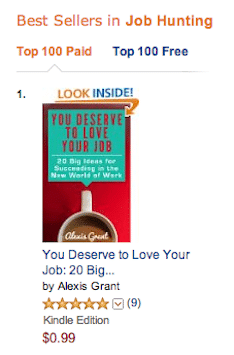
Uploading your book is actually quite simple. Choose your two categories carefully: these sections of the Kindle bookstore help potential buyers find your book while browsing and on Top 100 lists. We chose Careers –> Job Hunting and Careers –> Guides and have seen a marked difference: the book has consistently ranked higher in Job Hunting because Guides includes more heavy-hitters in the career advice world (think The 4-Hour Workweek and The $100 Startup). We did hit #1 in both categories, though.
Add up to seven keywords that will lead readers to your book. Be thoughtful about this: What terms will potential buyers search for in the Kindle store? What questions does your book answer? Upload your cover and choose whether you want Digital Rights Management protection for your book (Alexis chose to decline this).
Congratulations, you're ready to actually upload your book! Click “Browse” and select your mobi file. Once it has loaded, check it one more time with the Online Previewer, then click “Save & Continue” to move on to the Pricing section.
Your royalty options depend on the price you choose. Since we listed You Deserve to Love Your Job at $4.99, we chose the 70 percent royalty, which applies to books priced from $2.99 to $9.99. As Jeff Goins says in How to Start Publishing for Kindle, why would you pick 35 percent and give Amazon the majority share in your work?
Your first buyers on Kindle are likely part of your existing audience: blog readers, social media followers and friends. Reward these people who know, enjoy and support your work by giving them a great deal.
You Deserve to Love Your Job launched at $0.99 before jumping to its $4.99 regular price, so the 123 people who bought in the first 24 hours got a great deal. Alexis also offered a bonus to anyone who emailed her a screenshot of their honest review on launch day: a coupon for 20 percent off any of her courses or guides, which resulted in seven new reviews.
Incentivizing early purchasers also has another effect: when lots of people purchase at once, Amazon's algorithm picks up on your book and promotes it, exposing it to more potential buyers and helping your book climb the ranks.
While Amazon will help your book reach new readers, its algorithm requires the book to first hit a certain (mysterious) number of sales. To earn support from Amazon, you need to spread the word about your book yourself.
Alexis detailed our marketing and promotion plan in her launch analysis post, and we executed it well. However, your efforts can't end after launch: plan to continue marketing your book for as long as you want to make sales.
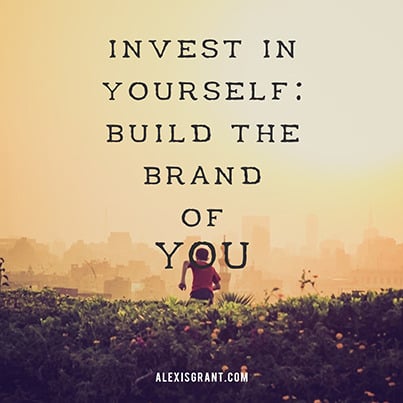
What's the best way to do that? Write and submit guest posts that support your book. Share important quotes on social media; we created quote images for several of the book's sound bites. Continue to link to your book in your blog posts, social media updates and email signature. Plan promotions: remember that for each 90-day KDP Select cycle, you get either five Free Days or one seven-day Countdown Deal. Get creative to market your book to new buyers.
You want to see results from all this hard work, right?
Use a simple spreadsheet to track your book's performance (we use Google docs). Here's what we measure:
Sales: Your KDP Report only shows month-to-date sales; if you want daily sales, track them yourself by checking this report every 24 hours. Since this is an experiment, we track sales in all countries, and we've been surprised at the numbers from outside North America — hello, buyers in the UK, Denmark, Spain and Australia!
Borrows: Because the book is in the Kindle Owners Lending Library, it earns a portion of a monthly pool based on its number of borrows. Borrows also contribute to the book's rankings; Amazon's algorithm treats them like sales. Borrows appear in the same month-to-date sales report and we track them monthly.
Reviews: Check your book's sales page to see how many reviews it has earned and what readers think. We track the number of reviews of each star rating and note any recurring feedback on a weekly basis.
Rank: While some Kindle experts like Steve Scott discourage tracking rank (in his Kindle book Is $.99 the New Free?), we consider it part of the experiment. Check your book's sales page under “Product Details” to see its rank overall in the Kindle store and in each of its categories. Rankings are updated hourly; be careful not to get sucked into hitting Refresh every few minutes!
Alexis covered the results of our launch in an earlier blog post, but the final tally for February 2014 was $200.24 from 168 sales.
While You Deserve to Love Your Job isn't raking in the big bucks, as Alexis wrote, “[the] goal here wasn't immediate revenue. The goal is to help people approach work differently. And just think: after only [10 days] of sales, [168] people might now feel motivated to make a change so they feel happier with their jobs.”
If you have any more questions about the process of publishing for Kindle, I'll do my best to answer in the comments!
And if you want a copy of You Deserve to Love Your Job, it's available on… you guessed it… Amazon.
Amazing post, Heather! Thanks for the extremely detailed breakdown of how Kindle Publishing works. I’m not ready to publish there yet, but I’ll definitely be hanging onto this post as a resource for the future.
Thanks, Jess! I’m glad it will be helpful for you. Best of luck with the process!
Great work, Heather + Lexi! I’m sure a lot of people will be bookmarking this is an awesome resource!
Thanks, Susan! It was a fun project, and hopefully the lessons I learned will save others some time and effort during the publishing process.
THANK YOU!!!! I have a post series that I want and need to convert to an ebook. I, too, have put it off for several months because of my fear of the unknown. Now I can’t wait to get started!!!
I’m glad the post will help you, Annette! It’s so easy to put off daunting projects, but I promise this isn’t as difficult as it might seem. Good luck with your ebook and let me know if you have specific questions!
What a detailed and helpful post! Thank you, Heather (and Lexi) — I’ll be sharing this with my friends!
Thanks, Susan — I’m glad you found it helpful!
Great tips in this article! I published my book this morning and plan to do some promotion through out the rest of the month.
Thanks, John — and congratulations on publishing your book!
Great summary, Heather, thanks!! Love the tips on Scrivener. I haven’t tried that function yet, but will.
Thanks, Lisa! Scrivener’s Compile function made conversion so much simpler than I thought it would be.
I just read your recent posts; congratulations on the all-clear and best of luck with the return to Laos!
Thanks Heather! Yeah, we’ll be glad to get back to “normal life”. It’s been a torrid year so far.
Wow, Heather – thank you so much for putting time into creating such a fantastic resource! (And thanks, Alexis, for sharing!) I can’t wait to share it further, especially for people who think that self-publishing is well beyond their reach. And I’ll certainly be bookmarking it for future projects up my sleeve 🙂 Cheers!
My pleasure, Sara! I’m glad that my takeaways will be helpful for others — hopefully they can save you some time and energy on your future projects!
Thanks for this, it’s useful to get information collated that covers the whole process rather that the many detailed guides that cover any single stage.
As someone hoping to put their first book out before the summer I was particularly interested in the comments on the use of Scrivener and .mobi file creation.
Thanks again!
I’m glad you found it helpful, Tony! Scrivener made creating the .mobi file much easier than it would have been otherwise, and it was great to be able to play with options by converting, reviewing the result, then tweaking settings again. It takes some time to find your preferred result, but it’s worth it!
Best of luck with the release of your book!
This is fantastic — detailed, organized and lots of good energy and emotion. It’s the ultimate guide. Thank you Heater and Alexis!
Thank you, Michael! I’m glad you enjoyed it and found it useful.
Hey Heather
This is definitely a post to be shared and filed! I found it super helpful and easy to understand, something I’m sure my fellow techno-phobes will appreciate as much as I did! Nice one.
Ang 🙂
Thanks, Ang! Yes, the nice thing about the process is that it isn’t actually that technical. Scrivener’s ability to convert the file means that you don’t have to strip it down to HTML, which can be a relief!
I’m glad you found it helpful!
You deserve a standing ovation! Very well put together and easy to follow steps 🙂
I’m encouraged and not intimidated about publishing now. Thanx a million!
Xman
Haha, thanks, Xavier! I’m glad you enjoyed the post and that it’s helped demystify the process — it definitely seems more intimidating than it really is. Good luck with your projects!
We are so lucky to have this guide. Thank you so much, Heather and Lexi!
Thanks Heather! Yeah, we’ll be glad to get back to “normal life”. It’s been a torrid year so far.
Thank you so much for this post! Creating an e-book is on my list and selling it through Amazon like this is the way to go. This really spells it all out. Quick question: Did you need to get an ISBN number since you\\\’re selling on Amazon?
You’re welcome, Jen — and thanks for sharing the post!
Great question. No, you don’t need an ISBN to sell an ebook through Amazon; they’ll automatically assign it a 10-digit “ASIN” that identifies your book when you hit publish, and that’s what they use to track your book. Many self-published ebooks don’t bother with an ISBN. Here’s the KDP FAQ about it: https://kdp.amazon.com/help?topicId=A36BYK5S7AJ2NQ#1-23_Do_I_need_an_ISBN
Thank you! You touched on so many bases. I really appreciate the information, and will share it for sure!
I’m glad you enjoyed it, Michele! Hope it helps you publish your projects!
Thanks so much for this great info!
A question – I plan to launch a book in the fall as both Kindle ebook and as a print book. I am thinking of running a Kickstarter campaign to fund and promote it over the summer.
Is there a way that I can give Kickstarter supporters some sort of coupon for a free or discounted Kindle edition to use later, once the book is produced?
Great question, Jackie. I don’t think there’s a way to do this if you’re in KDP Select, since you’ve committed not to selling or giving your book away elsewhere.
However, if you publish the book through KDP, you’d be able to send your supporters a free copy by email, perhaps as a PDF. Best of luck with your book launch!
Thanks very much, Heather!
can you tell me anyhting about copyrighting? did you go through the copyright office first or does amazon do that thanks much I bookmarked this post
I enjoy reading all I can about what’s going on in the world of self-publishing for Kindle. After launching The Lost Remnant in July 2014 with a hefty marketing push, I decided KDP Select was not for me. It may not fit my overall plan at the moment, but once I build my title list I may come back to it. I’m still in love with Amazon regardless!
Thanks for this publishing guide, Heather. Self-publishing is a great way to share writers’ works and it’s gaining a lot of attention right now. This will be really helpful for a lot of people who are starting to take an interest.
I’m glad you found the post helpful, John!
It’s awesome but I don’t know how to do this process. I even don’t know ABCD of how to do .Can I get anyone who can transform my manuscript into eBook.
Please help me.
Really Heather, this is the best source that I have found on kdp recently. Thanks for your amazing work. It goads us to make the things a bit fast. Keep doing this.
Thanks for your kind words, Javo! Best of luck with your KDP projects.
Thanks for sharing this Heather! I just finished my e-book today and am in the process of having the cover made and conversion of my .doc file (NOT YET a Scrivener user) and found this while searching for some important pre-launch guidelines.
Excited for my first Kindle e-book, but nervous as well!
Caleb
This is about the BEST resource I’ve seen so far on Amazon Kindle Publishing. I’m a new publisher there and have not made any serious effort at promoting my work, but fortunately I still rake in a few sales monthly.
I’m grateful for this. It’ll surely go along way for me. Thank you.
Thanks, Nicholas!
You’re very welcome, Caleb! Best of luck with your Kindle release — it’s fun to watch the sales come in.
I always heard Kindle Publishing, now I have quite knowledge about them. I’m also planning to make an e-book story. Thank you Alexis for sharing step-by-step guide for selling books.
What an absolutely informative article! Everything I needed to know is here, plus a lot of stuff I didn’t know I needed to know. Fantastic job, I can’t thank you enough or praise you more highly, and I’m not normally prone to write comments.
Kat
Wow, Kat — thanks for the kind words! I’m glad you found the post helpful. Best of luck with your project!
what if they ask for tax information? and if you don’t have any tax information? and in order to publish a book on KDP you need tax information.
Hi there.
I understand that I cannot sell my digital book elsewhere. If, however, I wish to publish the book with a commercial publisher, am I allowed to send a hardcopy to the publisher in order for them to review?
Kind regards. Vanessa Reeve
Hi Heather,
Thanks so much. That’s great information!
I have a full color cookbook created in InDesign. I have both InDesign files and a PDF and I’m figuring out how to convert the files in ePub now.
Do you think uploading the ePub file will be sufficient for the Kindle or will I need to figure out how to covert the files I have into Mobi?
Thanks again
Is there a trial version of the Schrivner program – I wish the author had mentioned a cost to download. Or is there a program I can use other than the one the author mentions?
Great information for someone looking into possibly publishing on the Kindle platform. I am nowhere near that point bit having the information handy is extremely helpful. New to this whole concept. I don’t even know where to start if I wanted to do some type of blog on my subject. So glad there are people out there like you to point me in the right direction.
Hi,
Thank you so much for everything, one more question to add to the many.
How many words or pages is the least acceptable for an ebook?
Regards
Great tips and information about kindle publishing . But the revenue generated by the book itself, is it enough to support a writer’s work in the long term. And how frequently a book needs to be published to make a full time income out of it?
Thank you.
Thank You!
I am an excellent writer but there was no way I could afford all the expenses by going through a publishing company. I am so thankful I found your guide and now by following your instructions I now realize I can publish through Kindle, I can’t wait to get started! I am really excited to publish my kindle books.
Thankfully Yours,
Michael.
Blessings.
Hi this is a great post I must say; but I want to find out asides the manuscript and TOC what of other pages that come before the book text itself like acknowledgement, year of publishing and all that. Am I to simply prepare the manuscript and got to Scrivener for TOC?
I found the article helpful and am planning to publish my own book soon. Thank You